SKU: OT5490 Číslo položky: XW064 EAN: 8720828223642

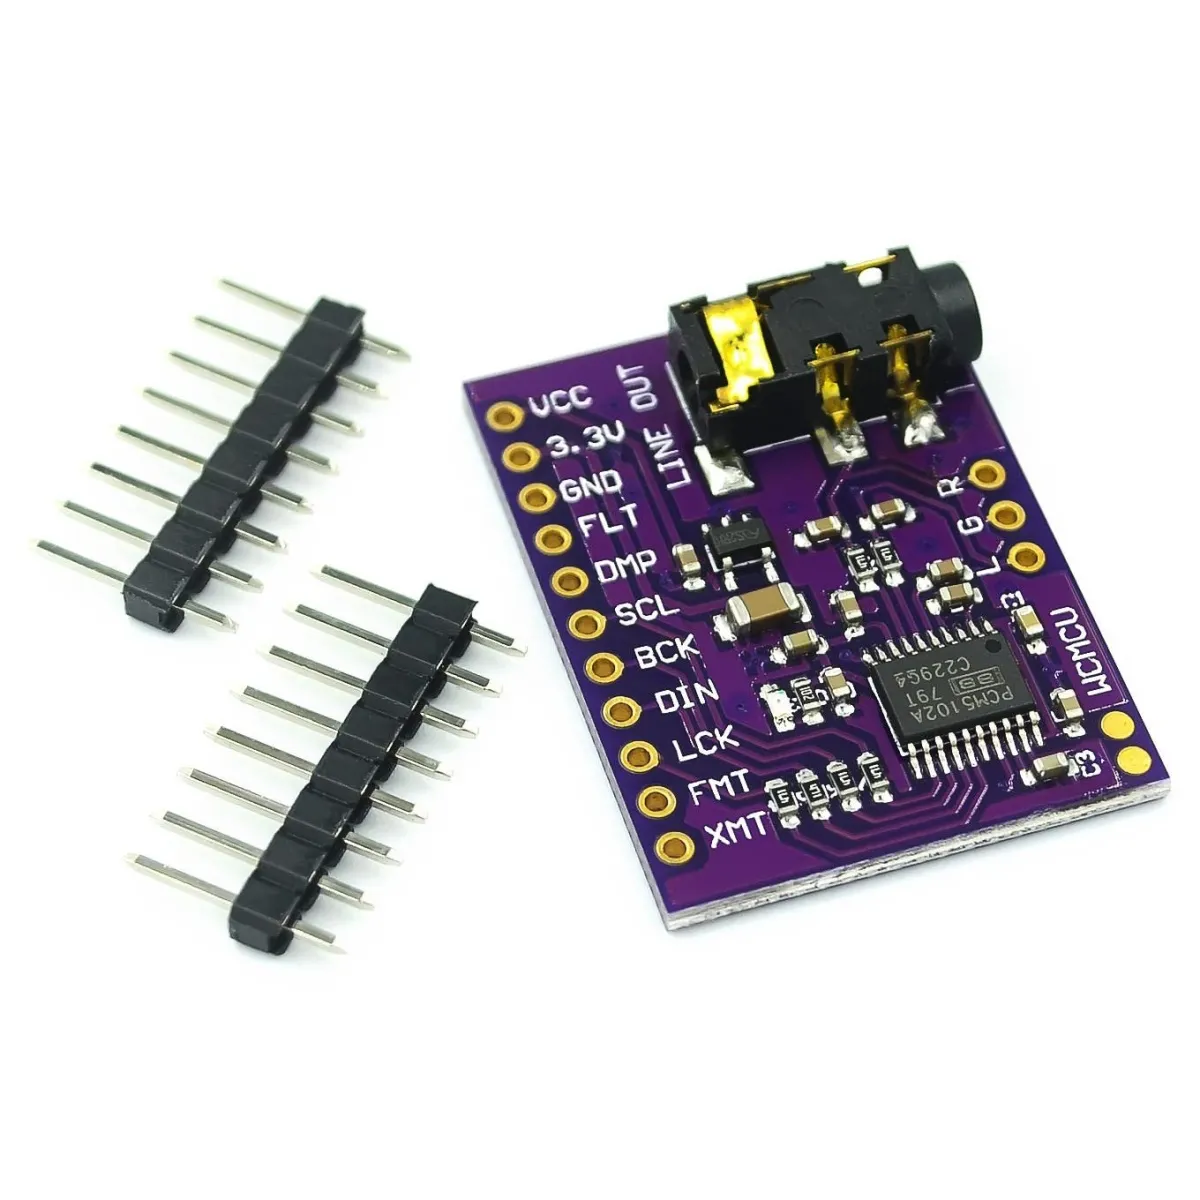
Tento PCM5102A je modul Digital-to-Analog Converter (DAC), který je primárně určen pro převod digitálních audio informací na analogový audio signál.
Technické specifikace:
Rozlišení: PCM5102A podporuje vysoce kvalitní audio s bitovou hloubkou až 32 bitů a vzorkovacími frekvencemi až 384 kHz.
Direct Path Architecture: Jednou z unikátních vlastností PCM5102A je architektura „Direct Path“, která umožňuje posílat signál přímo na výstup bez potřeby externího op-ampu nebo DC oddělovacího kondenzátoru.
Konektivita: PCM5102A využívá rozhraní I2S, které se běžně používá v audio aplikacích pro přenos digitálního audio signálu mezi komponentami.
Napájecí napětí: 3,3 V až 5 V.
Takto připojíš WCMCU-5102 modul stereo DAC digitálně-analogový převodník k Arduino UNO nebo ESP32, s ukázkovým sketchem, který můžeš hned nahrát.
Tento příklad ukazuje, jak napájet a nakonfigurovat modul DAC PCM5102A s Arduino Uno. Sketch nastavuje piny hardwarové konfigurace (mute, format, system clock, de-emphasis a filter) a zobrazuje stav modulu v Serial Monitor. Upozorňujeme, že analogový audio výstup je line-level a měl by být připojen k headphones nebo zesilovači, nikdy přímo ke speaker.
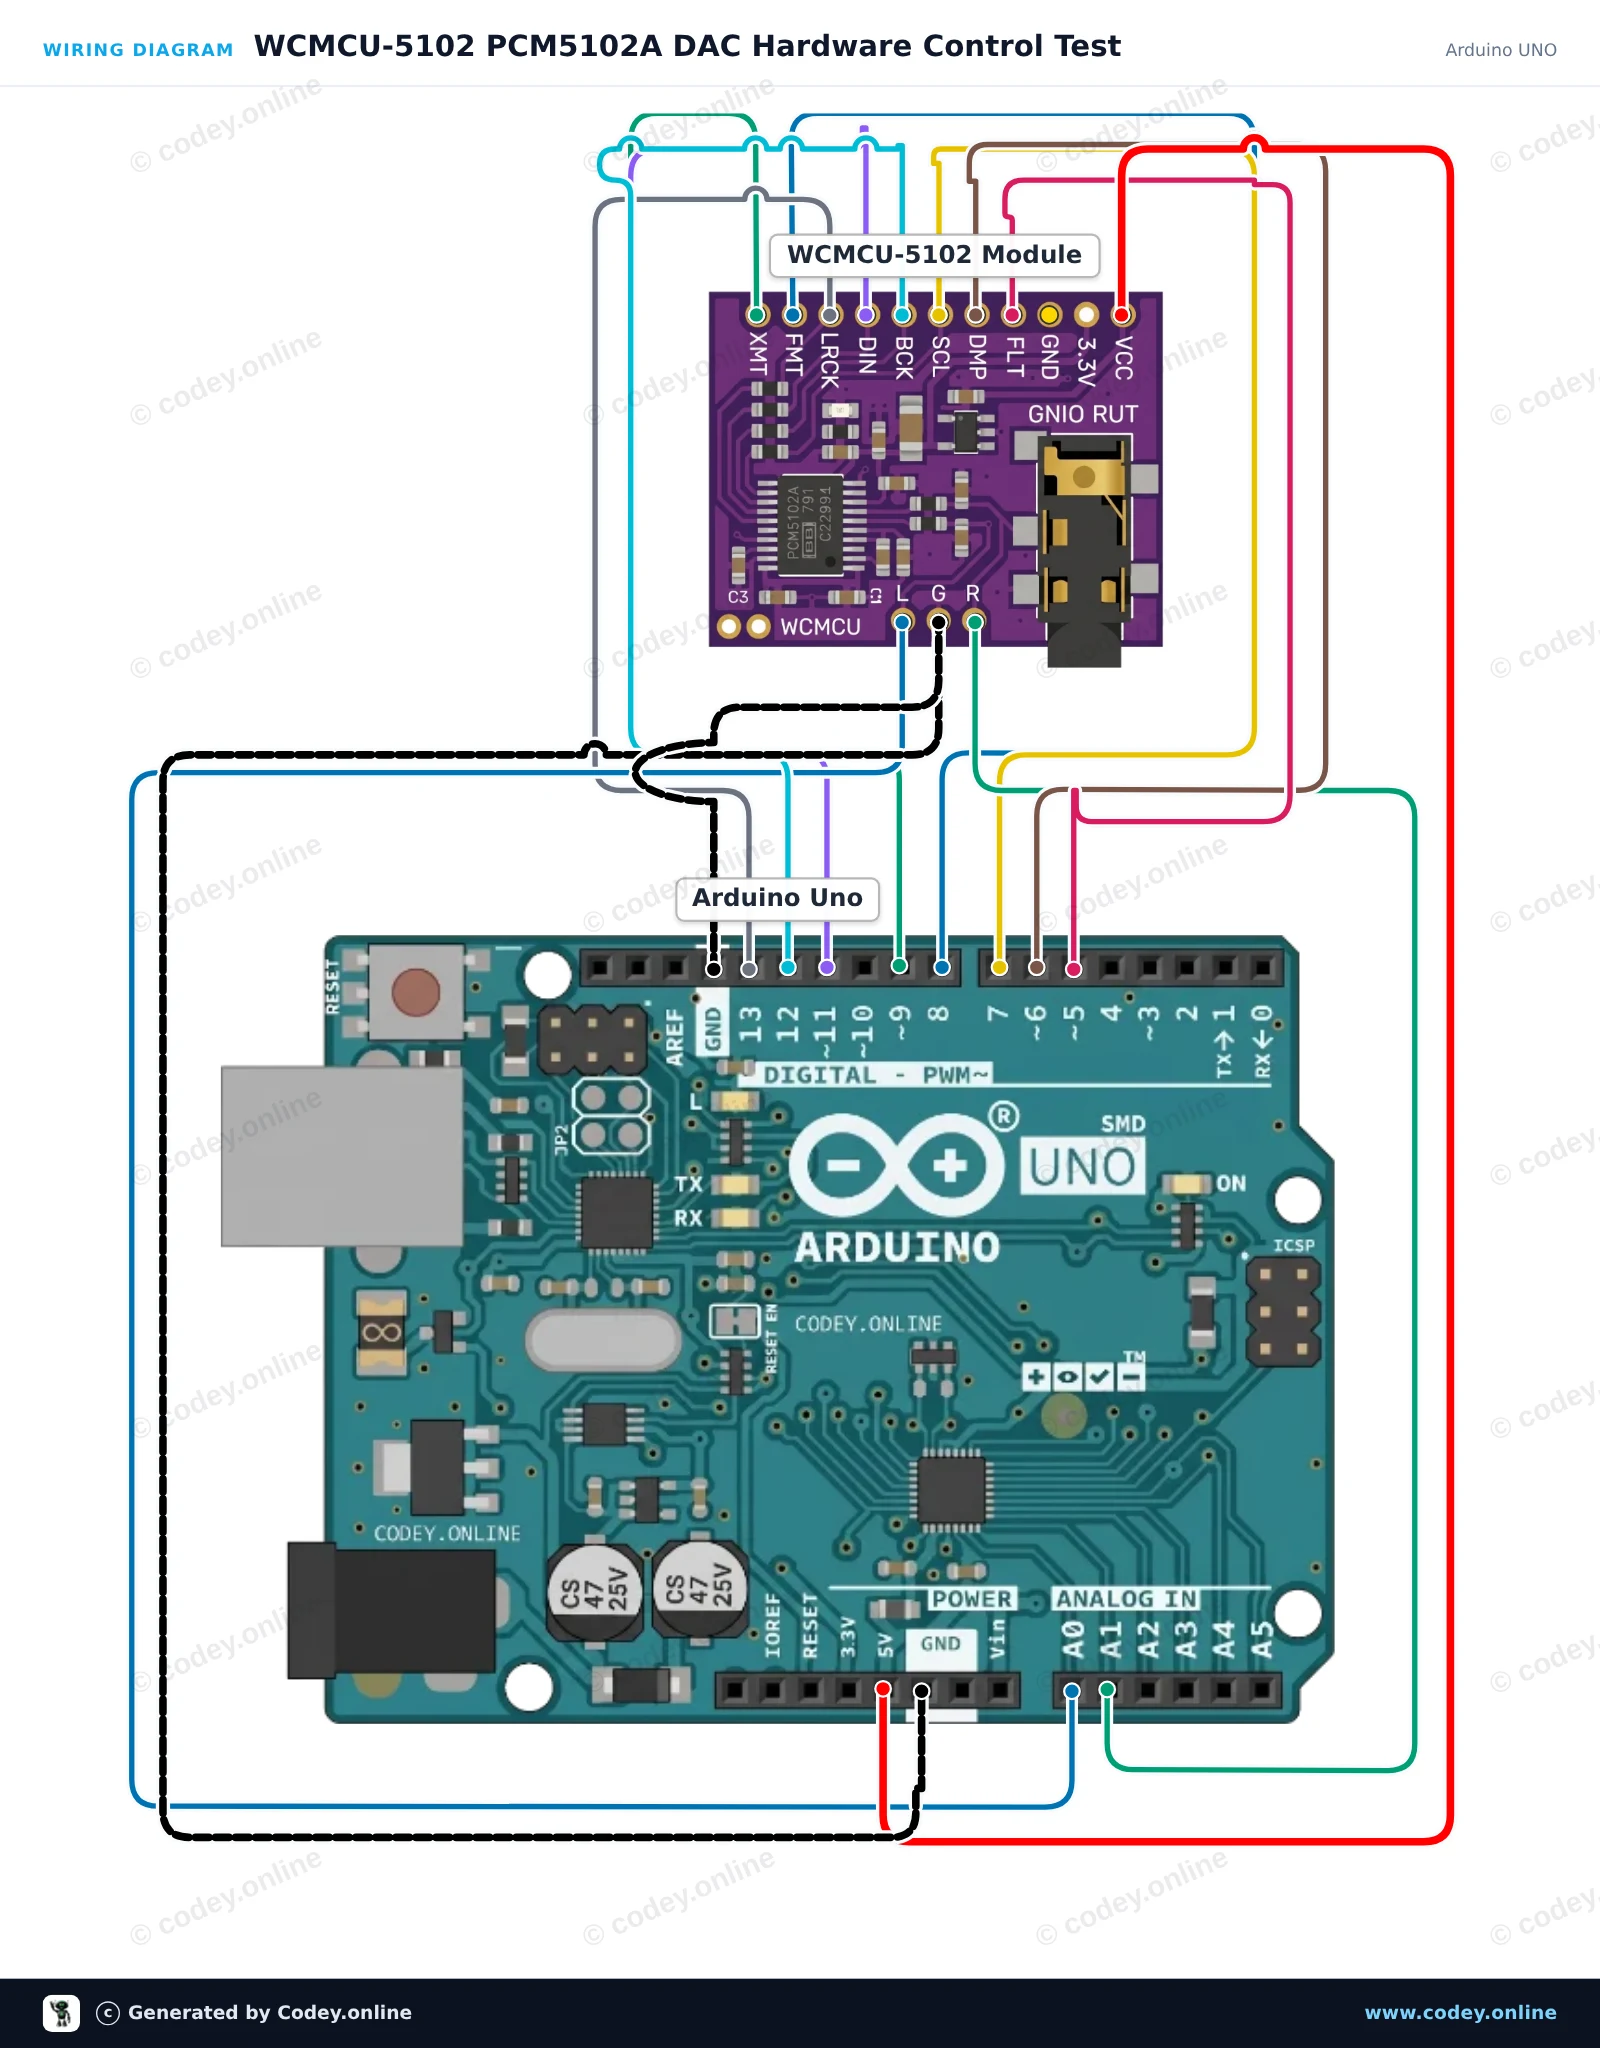
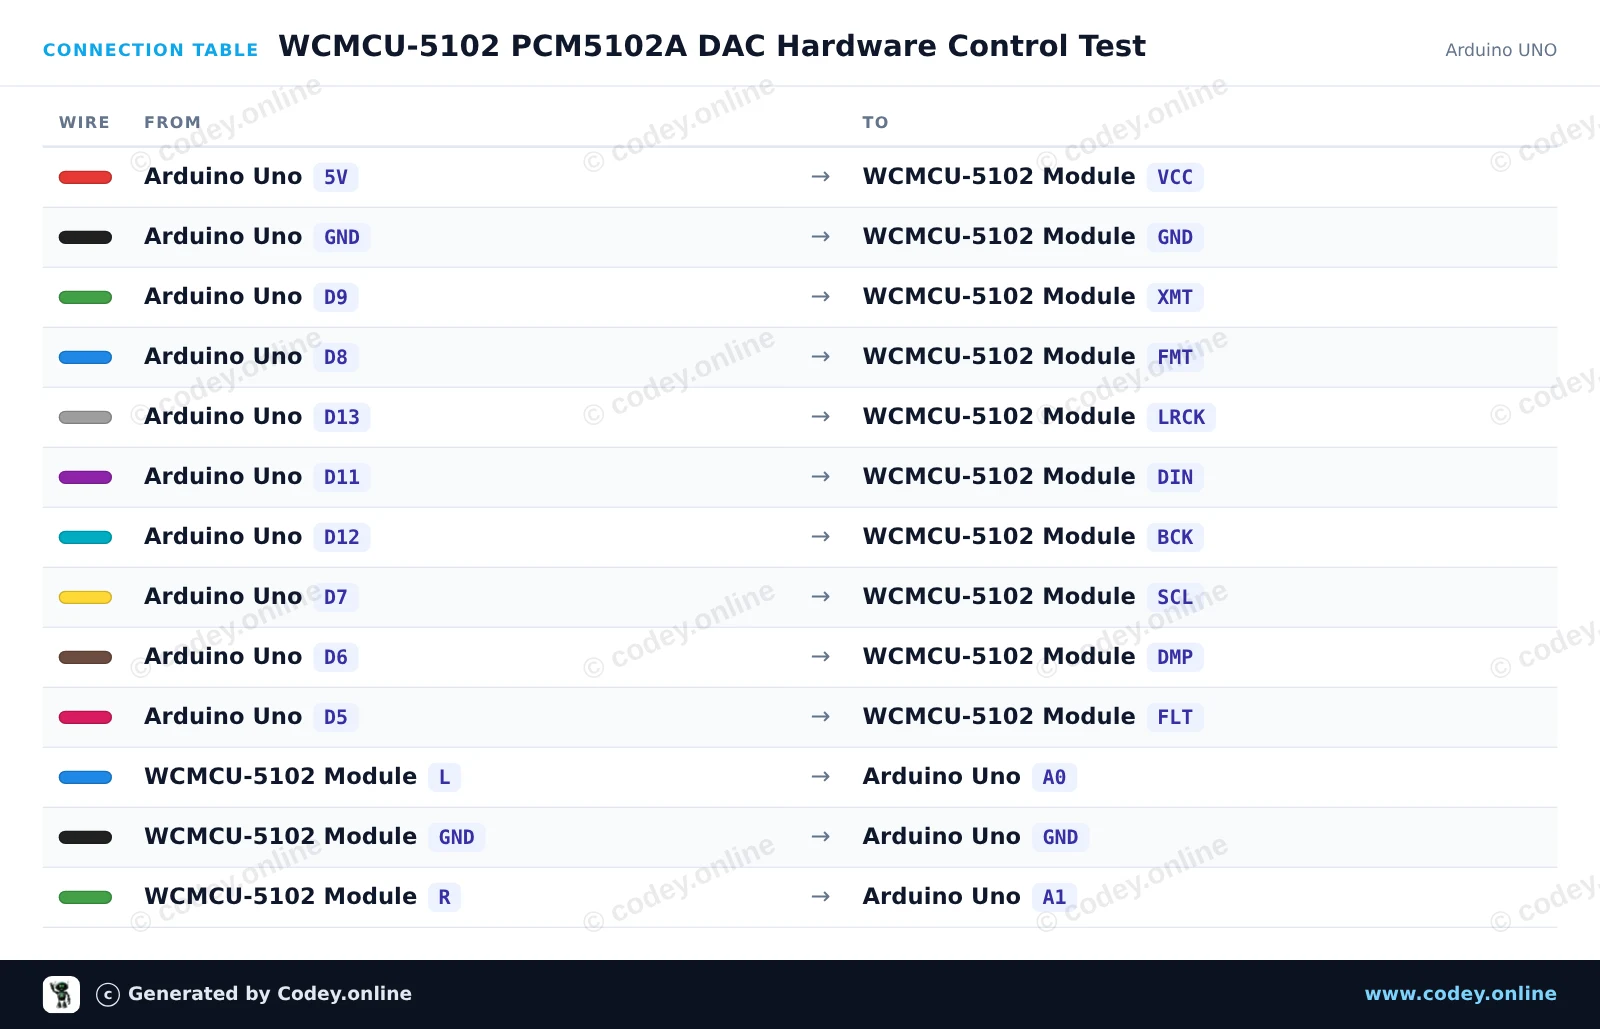
/*
 * ==================================================================
 *  Generated by Codey.online  —  https://www.codey.online
 * ==================================================================
 *  Project   : WCMCU-5102 PCM5102A DAC Hardware Control Test
 *  Board     : Arduino UNO (arduino:avr:uno)
 *  Parts     : WCMCU-5102 module
 *  Libraries : none (built-in)
 *
 *  Codey Online is an AI-powered browser IDE for Arduino and ESP32.
 *  Describe your project and Codey writes the code, draws the wiring
 *  diagram and uploads it to your board, straight from the browser.
 *  This code is free to use, modify and share, without warranty.
 * ==================================================================
 */

// WCMCU-5102 (PCM5102A) DAC Module Control Example
// Configures hardware control pins and toggles the unmute (XMT) signal.

const int PIN_XMT = 9;  // High = Unmute, Low = Soft mute
const int PIN_FMT = 8;  // Low = I2S format
const int PIN_SCL = 7;  // Low = Internal SCK generation
const int PIN_DMP = 6;  // Low = De-emphasis off
const int PIN_FLT = 5;  // Low = Normal latency filter

void setup() {
  Serial.begin(115200);
  while (!Serial);

  pinMode(PIN_XMT, OUTPUT);
  pinMode(PIN_FMT, OUTPUT);
  pinMode(PIN_SCL, OUTPUT);
  pinMode(PIN_DMP, OUTPUT);
  pinMode(PIN_FLT, OUTPUT);

  // Configure default PCM5102A operating modes
  digitalWrite(PIN_FMT, LOW);  // Set standard I2S format
  digitalWrite(PIN_SCL, LOW);  // Generate system clock internally
  digitalWrite(PIN_DMP, LOW);  // Disable de-emphasis filter
  digitalWrite(PIN_FLT, LOW);  // Normal latency filter
  digitalWrite(PIN_XMT, HIGH); // Unmute DAC output

  Serial.println(F("WCMCU-5102 DAC Initialized"));
  Serial.println(F("Configuration: I2S format, internal SCK, unmute active."));
  Serial.println(F("Note: Connect line outputs (L/R) to an amplifier or headphones."));
}

void loop() {
  // Periodic status display
  Serial.println(F("PCM5102A module active and unmuted."));
  delay(2000);
}Wiring diagram and example code generated by Codey.online — https://www.codey.online
Tento projekt propojuje ESP32 s PCM5102A stereo DAC přes digitální audio rozhraní I2S, aby vytvořil křišťálově čistý testovací tón 440 Hz. Připojte standardní 3.5mm sluchátka nebo zesilovač line-level do audio jacku, abyste slyšeli stereo výstup. Sketch syntetizuje čistou 16-bit sinusovou vlnu se vzorkovací frekvencí 44.1 kHz pomocí hardwarového I2S periferního rozhraní.
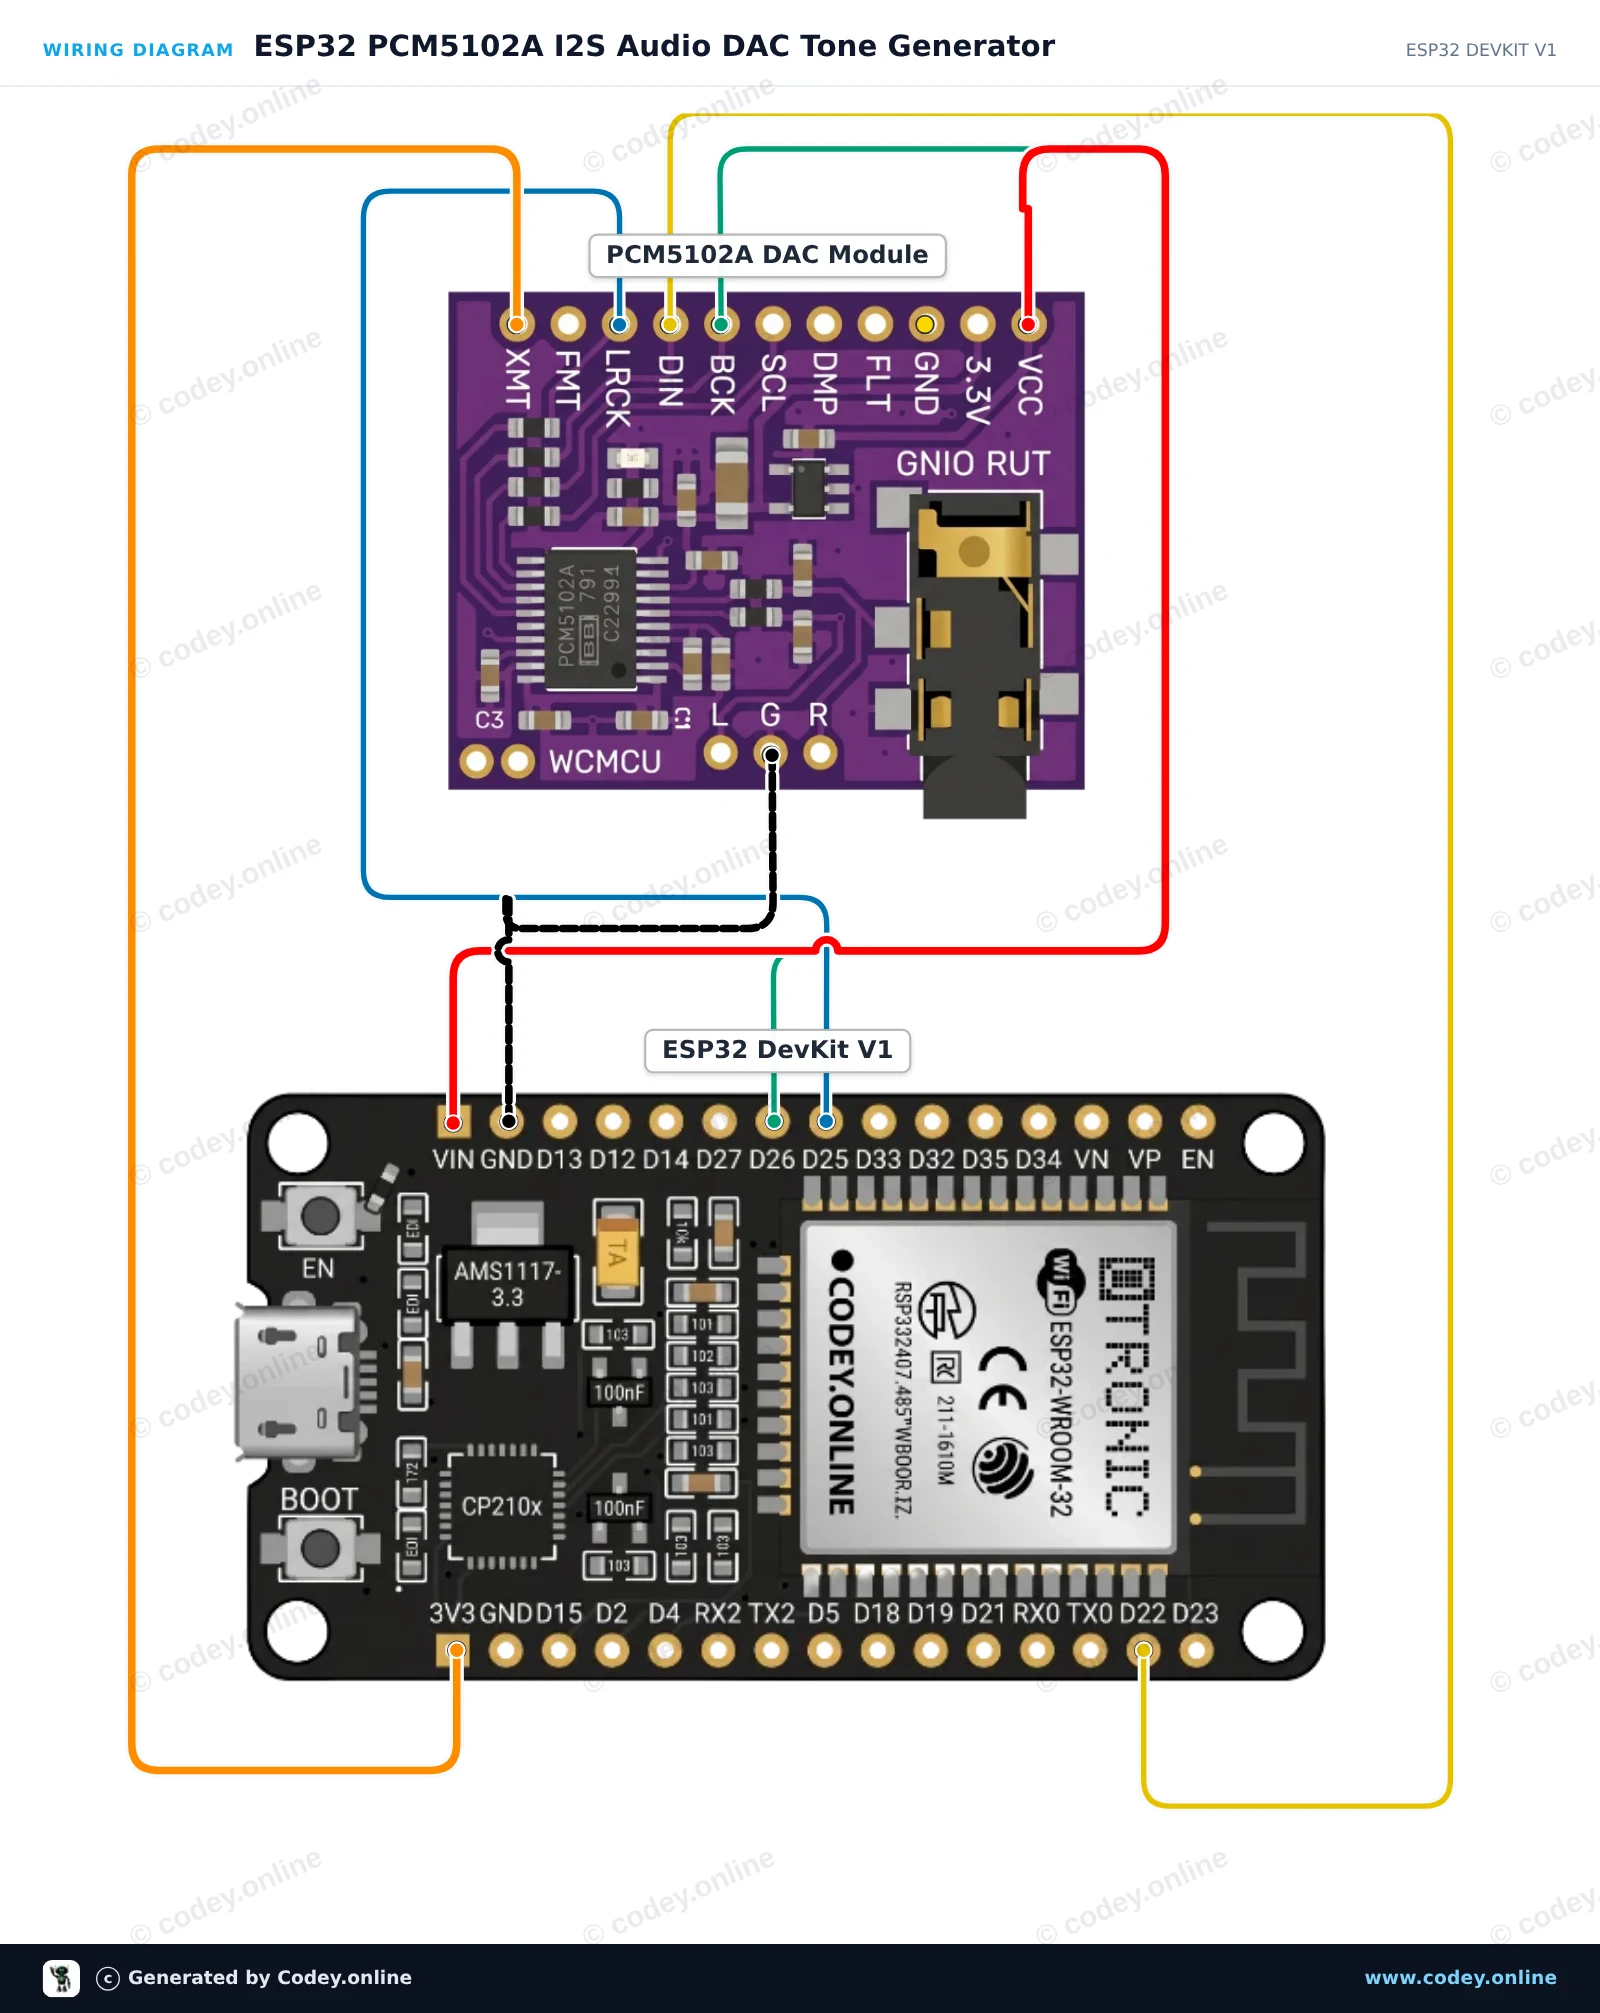
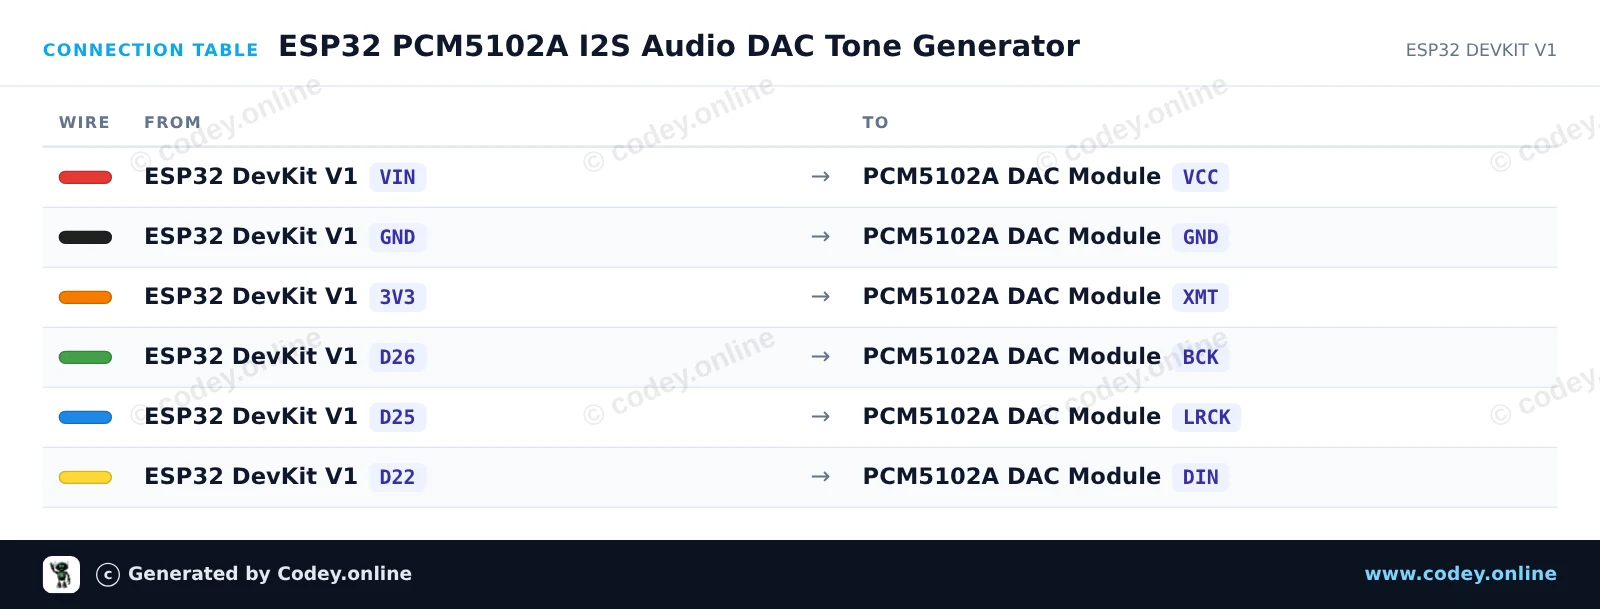
/*
 * ==================================================================
 *  Generated by Codey.online  —  https://www.codey.online
 * ==================================================================
 *  Project   : ESP32 PCM5102A I2S Audio DAC Tone Generator
 *  Board     : ESP32 DEVKIT V1 (esp32:esp32:esp32doit-devkit-v1)
 *  Parts     : WCMCU-5102 module
 *  Libraries : none (built-in)
 *
 *  Codey Online is an AI-powered browser IDE for Arduino and ESP32.
 *  Describe your project and Codey writes the code, draws the wiring
 *  diagram and uploads it to your board, straight from the browser.
 *  This code is free to use, modify and share, without warranty.
 * ==================================================================
 */

#include <Arduino.h>
#include "driver/i2s.h"
#include <math.h>

#define I2S_BCK_PIN   26
#define I2S_LRCK_PIN  25
#define I2S_DATA_PIN  22

const int SAMPLE_RATE = 44100;
const int TABLE_SIZE  = 128;
int16_t sineTable[TABLE_SIZE];

void setup() {
  Serial.begin(115200);
  Serial.println("ESP32 PCM5102A Audio Test");

  // Generate one period of a sine wave in a lookup table
  for (int i = 0; i < TABLE_SIZE; i++) {
    sineTable[i] = (int16_t)(sin(2.0 * PI * i / TABLE_SIZE) * 10000);
  }

  // Configure I2S peripheral
  i2s_config_t i2s_config = {
    .mode = (i2s_mode_t)(I2S_MODE_MASTER | I2S_MODE_TX),
    .sample_rate = SAMPLE_RATE,
    .bits_per_sample = I2S_BITS_PER_SAMPLE_16BIT,
    .channel_format = I2S_CHANNEL_FMT_RIGHT_LEFT,
    .communication_format = I2S_COMM_FORMAT_STAND_I2S,
    .intr_alloc_flags = ESP_INTR_FLAG_LEVEL1,
    .dma_buf_count = 8,
    .dma_buf_len = 64,
    .use_apll = false,
    .tx_desc_auto_clear = true
  };

  i2s_pin_config_t pin_config = {
    .bck_io_num = I2S_BCK_PIN,
    .ws_io_num = I2S_LRCK_PIN,
    .data_out_num = I2S_DATA_PIN,
    .data_in_num = I2S_PIN_NO_CHANGE
  };

  i2s_driver_install(I2S_NUM_0, &i2s_config, 0, NULL);
  i2s_set_pin(I2S_NUM_0, &pin_config);

  Serial.println("Playing continuous 440 Hz stereo tone...");
}

void loop() {
  size_t bytesWritten = 0;
  // Stream stereo samples (left and right channels)
  for (int i = 0; i < TABLE_SIZE; i++) {
    int16_t stereoSample[2] = { sineTable[i], sineTable[i] };
    i2s_write(I2S_NUM_0, stereoSample, sizeof(stereoSample), &bytesWritten, portMAX_DELAY);
  }
}Wiring diagram and example code generated by Codey.online — https://www.codey.online






 English
  Nederlands
  Frans
Frans  Deutsch
  Italiano
  Español
  Suomi
Suomi  Polski
  Dansk
Dansk  Ελληνικά
  Български
  Hrvatski
  Aileen